In this complete Docker tutorial for beginners, you will learn everything from scratch. We start with what Docker is and why it matters, then walk through installation, core concepts, essential commands, building your own Docker images with a Dockerfile, managing data with volumes, connecting containers with networks, and orchestrating multi-container applications with Docker Compose. Every step includes exact commands and file paths so you can follow along on your own machine.
What is Docker? A Simple Explanation for Beginners
Docker is an open-source platform for building, shipping, and running applications inside lightweight, isolated environments called containers. A container bundles your application's code together with its runtime, libraries, configuration files, and all dependencies into a single package that can be run anywhere — on your laptop, a colleague's workstation, a cloud server, or a Kubernetes cluster — with guaranteed identical behaviour.
Think of a Docker container like a shipping container on a cargo ship. A shipping container can hold any type of cargo, and the ship does not need to know anything about what is inside — it just transports containers. Similarly, Docker containers can hold any application, and the host machine just needs Docker installed to run them. This is the concept of containerization, and it has fundamentally changed how software is developed, tested, and deployed.
Docker was released in 2013 by Docker Inc. and quickly became the industry standard for containerization. Today it has over 6.5 million active developers worldwide, and understanding Docker is a requirement for virtually every DevOps, cloud engineering, and backend development role.
Docker vs Virtual Machine: What is the Difference?
One of the first questions beginners ask is how Docker containers differ from virtual machines (VMs). Both provide isolated environments, but they work in fundamentally different ways. A virtual machine emulates an entire computer — it includes a full operating system (kernel, system libraries, everything) running on top of a hypervisor. This makes VMs heavy: they typically use gigabytes of disk space and minutes to start up.
Docker containers, by contrast, share the host operating system's kernel. They only contain the application code and its immediate dependencies — not a full OS. This makes containers extremely lightweight (megabytes instead of gigabytes), and they start in seconds or even milliseconds rather than minutes. A single machine that might run 5–10 virtual machines can run hundreds of Docker containers simultaneously. For most application deployment scenarios, containers are the better choice because of this resource efficiency.
Installing Docker on Your Machine
Docker is available for Windows, macOS, and Linux. The installation process varies slightly by operating system, but Docker Desktop is the recommended option for Windows and macOS users as it provides a graphical interface alongside the Docker engine. Linux users install the Docker Engine directly via their package manager.
Install Docker on Ubuntu / Linux
On Ubuntu or Debian-based Linux systems, the fastest way to install Docker is using the official convenience script. Open your terminal and run the following commands one at a time. The first command updates your package list, the second installs required dependencies, and the final commands add the Docker repository and install Docker Engine.
Run in Terminal
sudo apt-get update
sudo apt-get install ca-certificates curl gnupg

sudo install -m 0755 -d /etc/apt/keyrings
curl -fsSL https://download.docker.com/linux/ubuntu/gpg | sudo gpg --dearmor -o /etc/apt/keyrings/docker.gpg
sudo chmod a+r /etc/apt/keyrings/docker.gpg

echo "deb [arch=$(dpkg --print-architecture) signed-by=/etc/apt/keyrings/docker.gpg] \
https://download.docker.com/linux/ubuntu $(. /etc/os-release && echo "$VERSION_CODENAME") stable" | \
sudo tee /etc/apt/sources.list.d/docker.list > /dev/null

sudo apt-get update
sudo apt-get install docker-ce docker-ce-cli containerd.io docker-buildx-plugin docker-compose-plugin
After installation, verify it is working correctly by running the classic hello-world test. This command downloads a tiny test image from Docker Hub and runs it in a container, which prints a confirmation message:
sudo docker run hello-world
To avoid typing sudo before every Docker command, add your user to the Docker group. This is recommended for development machines. Log out and back in for the change to take effect:
sudo usermod -aG docker $USER
newgrp docker
Install Docker on Windows and macOS
For Windows and macOS, download and install Docker Desktop from the official Docker website at https://www.docker.com/products/docker-desktop. Docker Desktop includes Docker Engine, Docker CLI, Docker Compose, and a graphical dashboard for managing your containers and images. After installation, open a terminal (PowerShell on Windows, Terminal on macOS) and verify the installation:
docker --version
docker compose version
You should see output similar to Docker version 26.x.x. If you see the version number, Docker is installed and ready to use.
Core Docker Concepts Every Beginner Must Know
Before running any Docker commands, it is important to understand the four core building blocks of Docker. These concepts appear in every Docker workflow, and understanding them clearly will make everything else in this tutorial much easier to follow.
1. Docker Image
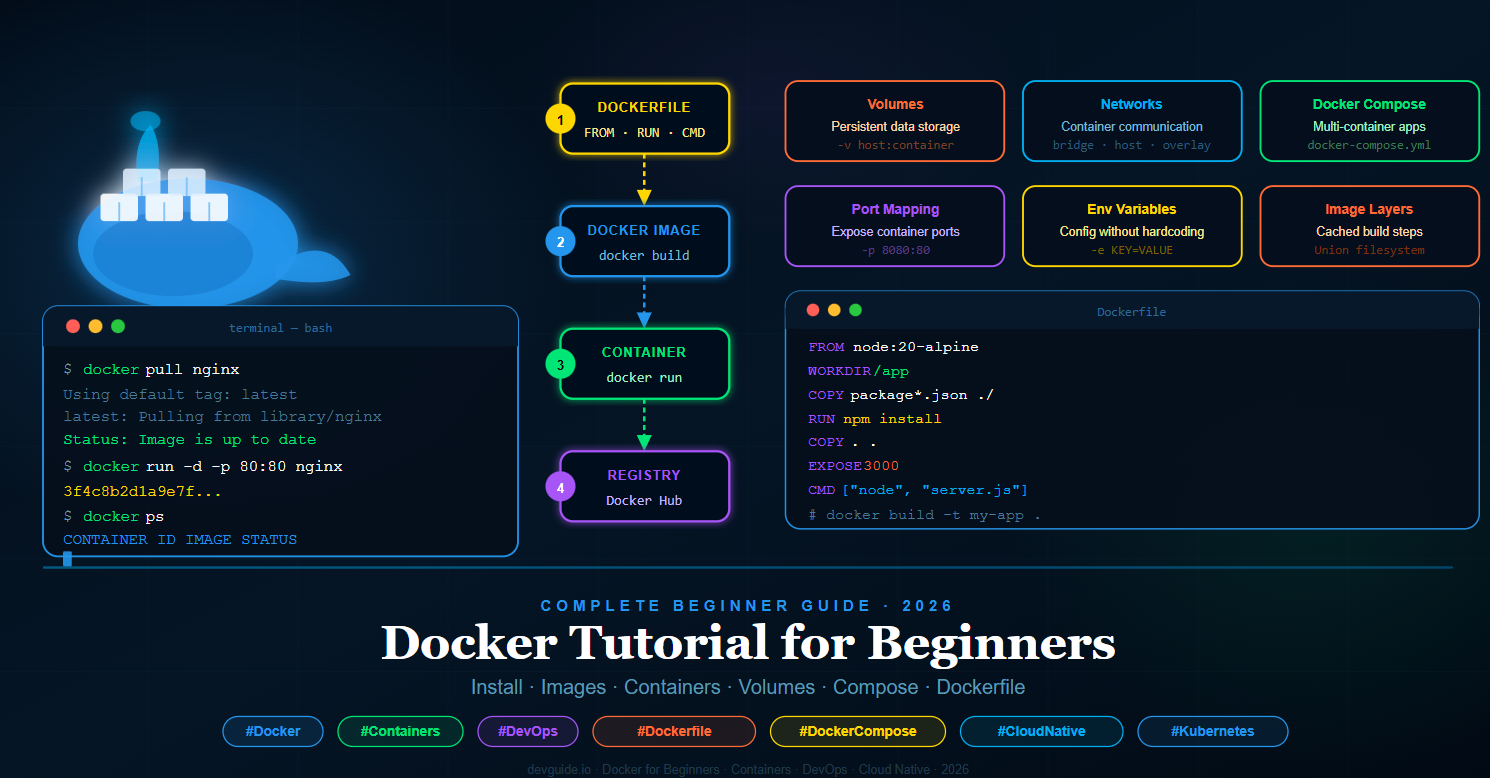
A Docker image is a read-only template that contains the instructions for creating a container. Think of an image as a blueprint or a recipe. It contains the operating system layer, your application code, all installed libraries and dependencies, environment variables, and the command to run when the container starts. Images are built from instructions written in a file called a Dockerfile (which we will cover in detail later), and they can be shared publicly on Docker Hub or privately in your own registry.
2. Docker Container
A Docker container is a running instance of a Docker image. When you execute docker run, Docker takes an image and starts a container from it. You can run multiple containers from the same image simultaneously — each container is isolated from the others, has its own file system, networking, and process space. Containers are ephemeral by default, meaning changes made inside a container do not persist when the container stops (unless you use volumes, which we cover later).
3. Docker Hub
Docker Hub is the official public registry for Docker images — think of it as GitHub but for Docker images. It hosts thousands of pre-built official images for popular technologies including Nginx, MySQL, PostgreSQL, Node.js, Python, Redis, MongoDB, and many more. When you run docker pull nginx, Docker downloads the official Nginx image from Docker Hub to your local machine. You can also create a free account on Docker Hub and publish your own images there.
4. Dockerfile
A Dockerfile is a plain text file that contains a series of instructions telling Docker how to build a custom image. Each instruction in a Dockerfile creates a new layer in the image, and Docker caches these layers to make subsequent builds faster. The Dockerfile is the foundation of reproducible Docker builds — the same Dockerfile will always produce the same image, on any machine, at any time.
Essential Docker Commands for Beginners
Now that you understand the core concepts, let us look at the Docker commands you will use every day. These commands cover working with images, running containers, managing containers, and inspecting what is happening inside Docker on your system.
Working with Docker Images
The following commands help you find, download, and manage Docker images on your local machine. The docker pull command downloads an image from Docker Hub without running it, which is useful when you want to pre-download images before going offline.
Run in Terminal
# Search for an image on Docker Hub
docker search nginx

# Download (pull) an image from Docker Hub
docker pull nginx

# Pull a specific version (tag) of an image
docker pull node:20-alpine

# List all images downloaded on your machine
docker images

# Remove a specific image
docker rmi nginx

# Remove all unused images at once
docker image prune -a
Running Docker Containers
The docker run command is the most important command in Docker — it creates and starts a container from an image. It accepts a large number of options that control how the container behaves. The most important options for beginners are the detached mode flag -d, which runs the container in the background, and the port mapping flag -p, which maps a port on your host machine to a port inside the container.
# Run a container interactively (you see the output, container stops when you exit)
docker run nginx

# Run a container in the background (detached mode)
docker run -d nginx

# Run a container with port mapping (host:container)
# Access your app at http://localhost:8080
docker run -d -p 8080:80 nginx

# Run a container with a custom name
docker run -d -p 8080:80 --name my-nginx nginx

# Run a container and pass an environment variable
docker run -d -e MYSQL_ROOT_PASSWORD=secret mysql

# Run a container and remove it automatically when it stops
docker run --rm nginx

# Run an interactive shell inside a container
docker run -it ubuntu bash
Managing Running Containers
Once your containers are running, you need commands to inspect them, stop them, start them again, and clean them up. The docker ps command shows you all running containers, and docker ps -a shows all containers including stopped ones.
# List all running containers
docker ps

# List all containers (including stopped ones)
docker ps -a

# Stop a running container
docker stop my-nginx

# Start a stopped container
docker start my-nginx

# Restart a container
docker restart my-nginx

# Remove a stopped container
docker rm my-nginx

# Force remove a running container
docker rm -f my-nginx

# Remove all stopped containers
docker container prune

# View logs from a container
docker logs my-nginx

# Follow logs in real time
docker logs -f my-nginx

# Open an interactive shell inside a running container
docker exec -it my-nginx bash

# View resource usage (CPU, memory) of running containers
docker stats
Writing Your First Dockerfile
A Dockerfile is where Docker truly becomes powerful. Instead of downloading a pre-built image, you write instructions that tell Docker exactly how to build a custom image containing your own application. Every line in a Dockerfile is a separate instruction, and Docker executes them in order from top to bottom, creating a new image layer at each step.
The following Dockerfile example creates an image for a Node.js web application. We will build this step by step. First, create a new project folder and inside it create the files as instructed below.
Setting Up the Node.js Application Files
Before writing the Dockerfile, create the actual application. These three files are the minimum needed for a working Node.js web server that Docker will containerize.
Create file: my-docker-app/package.json
{
  "name": "my-docker-app",
  "version": "1.0.0",
  "description": "A simple Node.js app running in Docker",
  "main": "server.js",
  "scripts": {
    "start": "node server.js"
  },
  "dependencies": {
    "express": "^4.18.2"
  }
}
Create file: my-docker-app/server.js
const express = require('express');
const app     = express();
const PORT    = process.env.PORT || 3000;

app.get('/', (req, res) => {
  res.send(`
    <h1>Hello from Docker!</h1>
    <p>This Node.js app is running inside a Docker container.</p>
    <p>Environment: ${process.env.NODE_ENV || 'development'}</p>
  `);
});

app.get('/health', (req, res) => {
  res.json({ status: 'ok', uptime: process.uptime() });
});

app.listen(PORT, () => {
  console.log(`Server running on port ${PORT}`);
});
Create file: my-docker-app/.dockerignore
The .dockerignore file works exactly like .gitignore — it tells Docker which files and folders to exclude when building the image. Always exclude node_modules because Docker will install fresh dependencies inside the container during the build.
node_modules
npm-debug.log
.git
.gitignore
.env
*.md
.DS_Store
Writing the Dockerfile
Now create the Dockerfile in the same folder. The filename must be exactly Dockerfile with a capital D and no file extension. Each instruction in this file creates one layer in the final image.
Create file: my-docker-app/Dockerfile
# Step 1: Choose the base image
# We use the official Node.js 20 image on Alpine Linux (very small, ~5MB)
FROM node:20-alpine

# Step 2: Set the working directory inside the container
# All subsequent commands run from this path
WORKDIR /app

# Step 3: Copy package.json files first (before copying source code)
# This allows Docker to cache the npm install layer separately
# Docker only re-runs npm install when package.json changes
COPY package*.json ./

# Step 4: Install production dependencies
RUN npm install --omit=dev

# Step 5: Copy the rest of your application source code
# The .dockerignore file prevents node_modules from being copied
COPY . .

# Step 6: Tell Docker which port the app listens on (documentation only)
# This does NOT actually publish the port — you do that with -p at runtime
EXPOSE 3000

# Step 7: Set environment variable
ENV NODE_ENV=production

# Step 8: Define the command to start the application
# This runs when someone does docker run on this image
CMD ["node", "server.js"]
Building and Running Your Docker Image
With your Dockerfile complete, you can now build your custom Docker image. Open a terminal in the my-docker-app folder and run the following build command. The -t flag tags your image with a name so you can reference it easily. The . at the end tells Docker to look for the Dockerfile in the current directory.
Run in Terminal — inside my-docker-app/ folder
# Build the Docker image and tag it as "my-node-app"
docker build -t my-node-app .

# See your new image in the list
docker images

# Run a container from your image
# Maps host port 3000 to container port 3000
docker run -d -p 3000:3000 --name my-app my-node-app

# Verify it is running
docker ps

# Test it works
curl http://localhost:3000
Open your browser and navigate to http://localhost:3000. You will see the "Hello from Docker!" page served by your Node.js application running inside a Docker container. Congratulations — you have just built and run your first custom Docker image.
Docker Volumes: Persistent Data Storage
By default, Docker containers are stateless — any data written inside a container is lost when that container is stopped and removed. This is actually a desirable property for application code (it makes containers reproducible and disposable), but it is a problem when your application needs to store data that must survive container restarts, such as database files, uploaded user files, or log archives.
Docker volumes are the solution. A volume is a storage location that exists outside the container's file system, managed by Docker on the host machine. Volumes persist independently of the container lifecycle — even if you delete and recreate a container, the volume and its data remain intact. There are two types of volume mounts you will use regularly.
Named Volumes
Named volumes are managed entirely by Docker. Docker decides where to store the data on the host (typically under /var/lib/docker/volumes/). You refer to the volume by name. This is the recommended approach for database data and other persistent application data.
Run in Terminal
# Create a named volume
docker volume create my-data

# List all volumes
docker volume ls

# Run a container using a named volume
# Format: -v volume-name:path-inside-container
docker run -d \
  -p 5432:5432 \
  -e POSTGRES_PASSWORD=mysecretpassword \
  -v postgres-data:/var/lib/postgresql/data \
  --name my-postgres \
  postgres:16-alpine

# Inspect a volume to see where Docker stores the data on the host
docker volume inspect postgres-data

# Remove a volume (only when no container is using it)
docker volume rm my-data

# Remove all unused volumes
docker volume prune
Bind Mounts
A bind mount maps a specific folder on your host machine directly into the container. Unlike named volumes, you specify the exact host path. Bind mounts are ideal for development workflows because you can edit files on your host machine and the changes are immediately visible inside the running container — no need to rebuild the image every time you change a line of code.
# Bind mount: map current directory ($(pwd)) into /app in the container
# Any changes you make to files on your host are immediately reflected in the container
docker run -d \
  -p 3000:3000 \
  -v $(pwd):/app \
  -v /app/node_modules \
  --name my-app-dev \
  my-node-app

# On Windows PowerShell, use ${PWD} instead of $(pwd)
docker run -d -p 3000:3000 -v ${PWD}:/app my-node-app
Docker Networking: Connecting Containers
When you have multiple containers that need to communicate with each other — for example, a Node.js application container that needs to connect to a MySQL database container — you need Docker networking. By default, each container is isolated and cannot communicate with other containers unless you explicitly connect them through a shared network.
Docker supports several network types. The most important for beginners are bridge networks (the default, used for containers on the same host) and host networks (where the container shares the host's network stack directly). For multi-container applications, the best practice is to create a custom bridge network and attach all related containers to it.
Run in Terminal
# List all Docker networks
docker network ls

# Create a custom bridge network
docker network create my-app-network

# Run a MySQL container on the custom network
docker run -d \
  --name mysql-db \
  --network my-app-network \
  -e MYSQL_ROOT_PASSWORD=root \
  -e MYSQL_DATABASE=myapp \
  -v mysql-data:/var/lib/mysql \
  mysql:8.0

# Run your app container on the same network
# Your app can reach the database using hostname "mysql-db" (the container name)
docker run -d \
  --name my-app \
  --network my-app-network \
  -p 3000:3000 \
  -e DB_HOST=mysql-db \
  -e DB_USER=root \
  -e DB_PASSWORD=root \
  my-node-app

# Inspect a network
docker network inspect my-app-network

# Remove a network
docker network rm my-app-network
The key insight here is that when containers are on the same Docker network, they can reach each other using the container name as the hostname. In the example above, your Node.js app can connect to MySQL using the hostname mysql-db — Docker's internal DNS resolves this to the correct container's IP address automatically.
Docker Compose: Managing Multi-Container Applications
Running individual Docker commands for each container becomes cumbersome quickly when your application has multiple services — a web server, a database, a cache, a background worker. Docker Compose solves this by letting you define all your services, networks, and volumes in a single YAML file called docker-compose.yml. Then you start, stop, and manage your entire application stack with a single command.
Docker Compose is included with Docker Desktop on Windows and macOS, and it is installed with the Docker Compose plugin on Linux. This is the standard tool for local development environments and is also widely used in production deployments.
Building a Full-Stack App with Docker Compose
The following example creates a complete web application stack: a Node.js application, a MySQL database, and a Redis cache — all connected, configured, and started with one command.
Create file: my-docker-app/docker-compose.yml
version: '3.9'

services:

  # ── Node.js Application ──────────────────────────────────
  app:
    build:
      context: .
      dockerfile: Dockerfile
    container_name: my-app
    restart: unless-stopped
    ports:
      - "3000:3000"
    environment:
      NODE_ENV: development
      DB_HOST: mysql
      DB_PORT: 3306
      DB_NAME: myapp_db
      DB_USER: appuser
      DB_PASSWORD: apppassword
      REDIS_HOST: redis
      REDIS_PORT: 6379
    volumes:
      - .:/app
      - /app/node_modules
    depends_on:
      mysql:
        condition: service_healthy
      redis:
        condition: service_started
    networks:
      - app-network

  # ── MySQL Database ────────────────────────────────────────
  mysql:
    image: mysql:8.0
    container_name: mysql-db
    restart: unless-stopped
    environment:
      MYSQL_ROOT_PASSWORD: rootpassword
      MYSQL_DATABASE: myapp_db
      MYSQL_USER: appuser
      MYSQL_PASSWORD: apppassword
    ports:
      - "3306:3306"
    volumes:
      - mysql-data:/var/lib/mysql
      - ./database/init.sql:/docker-entrypoint-initdb.d/init.sql
    healthcheck:
      test: ["CMD", "mysqladmin", "ping", "-h", "localhost"]
      timeout: 10s
      retries: 5
      interval: 10s
    networks:
      - app-network

  # ── Redis Cache ───────────────────────────────────────────
  redis:
    image: redis:7-alpine
    container_name: redis-cache
    restart: unless-stopped
    ports:
      - "6379:6379"
    volumes:
      - redis-data:/data
    command: redis-server --appendonly yes
    networks:
      - app-network

  # ── phpMyAdmin (Database UI) ──────────────────────────────
  phpmyadmin:
    image: phpmyadmin:latest
    container_name: phpmyadmin
    restart: unless-stopped
    ports:
      - "8080:80"
    environment:
      PMA_HOST: mysql
      PMA_USER: appuser
      PMA_PASSWORD: apppassword
    depends_on:
      - mysql
    networks:
      - app-network

# ── Named Volumes ─────────────────────────────────────────
volumes:
  mysql-data:
    driver: local
  redis-data:
    driver: local

# ── Networks ──────────────────────────────────────────────
networks:
  app-network:
    driver: bridge
Optional: Database Initialization SQL
Docker Compose can automatically run SQL files when the database first starts. Create the following SQL file so your MySQL database is set up with an initial table structure automatically.
Create file: my-docker-app/database/init.sql
-- This file runs automatically when the MySQL container starts for the first time

CREATE TABLE IF NOT EXISTS users (
  id         INT AUTO_INCREMENT PRIMARY KEY,
  name       VARCHAR(100)        NOT NULL,
  email      VARCHAR(150) UNIQUE NOT NULL,
  created_at TIMESTAMP DEFAULT   CURRENT_TIMESTAMP
);

CREATE TABLE IF NOT EXISTS posts (
  id         INT AUTO_INCREMENT PRIMARY KEY,
  user_id    INT          NOT NULL,
  title      VARCHAR(200) NOT NULL,
  content    TEXT,
  created_at TIMESTAMP DEFAULT CURRENT_TIMESTAMP,
  FOREIGN KEY (user_id) REFERENCES users(id)
);

INSERT INTO users (name, email) VALUES
  ('Alice Johnson', 'alice@example.com'),
  ('Bob Smith',     'bob@example.com');

INSERT INTO posts (user_id, title, content) VALUES
  (1, 'My First Docker Post', 'Learning Docker is fun and powerful!'),
  (2, 'Docker Compose Guide',  'Docker Compose simplifies multi-service apps.');
Running Docker Compose
With your docker-compose.yml file ready, managing your entire application is now done with simple, memorable commands. Run these from the folder containing your docker-compose.yml file.
Run in Terminal — inside my-docker-app/ folder
# Start all services in detached (background) mode
# Docker builds any images that need building automatically
docker compose up -d

# View running services
docker compose ps

# View logs from all services at once
docker compose logs

# Follow logs in real time from a specific service
docker compose logs -f app

# Restart a specific service
docker compose restart app

# Stop all services (containers stop, data is preserved in volumes)
docker compose stop

# Stop and remove all containers, networks (volumes are preserved)
docker compose down

# Stop and remove everything INCLUDING volumes (WARNING: deletes all data)
docker compose down -v

# Rebuild images and restart (use after changing Dockerfile or dependencies)
docker compose up -d --build
After running docker compose up -d, your full application stack is running. Access your Node.js app at http://localhost:3000, phpMyAdmin at http://localhost:8080, and your MySQL database directly at port 3306. All four services are connected, networked, and ready to use — started with a single command.
A Production-Ready Dockerfile: Multi-Stage Builds
As you progress beyond the basics, you will want to optimise your Docker images for production. The single most impactful optimisation is using multi-stage builds — a Docker feature that lets you use multiple FROM instructions in a single Dockerfile. You build your application in a "builder" stage that has all your development tools and dependencies, then copy only the compiled output into a clean, minimal "production" stage. The final image does not contain build tools, source code, or development dependencies — only what is needed to run the application.
This typically reduces production image sizes by 50–90%. A Node.js app that might be 800MB as a simple image can become 80MB with a multi-stage build.
Create file: my-docker-app/Dockerfile.production
# ═══════════════════════════
# STAGE 1: Builder
# This stage installs all dependencies and builds the app
# ═══════════════════════════
FROM node:20-alpine AS builder

WORKDIR /build

# Copy package files and install ALL dependencies (including devDependencies)
COPY package*.json ./
RUN npm ci

# Copy source code and run your build step (TypeScript compile, etc.)
COPY . .
RUN npm run build 2>/dev/null || echo "No build script, skipping"


# ═══════════════════════════
# STAGE 2: Production Runner
# This is the final lightweight image — no build tools, no devDependencies
# ═══════════════════════════
FROM node:20-alpine AS production

# Create a non-root user for security best practice
RUN addgroup -S appgroup && adduser -S appuser -G appgroup

WORKDIR /app

# Copy only the production package files
COPY package*.json ./

# Install ONLY production dependencies
RUN npm ci --omit=dev && npm cache clean --force

# Copy compiled output from the builder stage (not the full source)
COPY --from=builder /build/dist ./dist
COPY --from=builder /build/server.js ./server.js

# Set ownership to the non-root user
RUN chown -R appuser:appgroup /app

# Switch to non-root user
USER appuser

ENV NODE_ENV=production
EXPOSE 3000

# Health check so Docker knows if the container is healthy
HEALTHCHECK --interval=30s --timeout=10s --start-period=5s --retries=3 \
  CMD wget --no-verbose --tries=1 --spider http://localhost:3000/health || exit 1

CMD ["node", "server.js"]
Build and compare the image sizes to see the difference multi-stage builds make:
# Build the production-optimised image
docker build -f Dockerfile.production -t my-node-app:production .

# Compare sizes of the two images
docker images | grep my-node-app
Useful Docker Tips and Best Practices for Beginners
Now that you have a solid foundation in Docker, here are the most important best practices that professional Docker users follow. Adopting these habits early will save you significant time and prevent common problems as your projects grow more complex.
Always use specific image tags. Never use FROM node:latest or docker pull nginx:latest in production. The latest tag changes whenever a new version is released, which can break your application unexpectedly. Always pin to a specific version: FROM node:20.12-alpine3.19. This ensures your builds are reproducible and predictable.
Put frequently changing instructions last in your Dockerfile. Docker caches each layer. If you COPY . . at the top, Docker invalidates the cache and reinstalls all dependencies every time any file changes. By copying package*.json first and running npm install before copying your source code, Docker only re-runs the install when your dependencies actually change — making builds dramatically faster.
Always use a .dockerignore file. Excluding unnecessary files like node_modules, .git, *.log, and .env keeps your build context small and prevents sensitive files from being accidentally baked into your image. A large build context slows down every docker build command.
Never store secrets in your Dockerfile or image. If you write ENV DB_PASSWORD=mysecret in a Dockerfile, that password is permanently baked into the image layer and visible to anyone who has the image. Pass secrets at runtime using environment variables (-e) or Docker secrets, or use a secrets management service.
Run containers as a non-root user. By default, processes inside Docker containers run as root, which is a security risk. Create a dedicated user in your Dockerfile and switch to it with the USER instruction before your CMD, as shown in the multi-stage Dockerfile above.
Complete Project File Structure
Here is the complete folder and file structure for everything built in this tutorial. Use this as a reference to make sure you have created all the necessary files in the correct locations.
my-docker-app/
├── Dockerfile                 ← Basic Docker image definition
├── Dockerfile.production      ← Optimised multi-stage production image
├── docker-compose.yml         ← Multi-service orchestration (app + MySQL + Redis + phpMyAdmin)
├── .dockerignore              ← Files excluded from Docker build context
├── package.json               ← Node.js project manifest
├── server.js                  ← Node.js Express web server
└── database/
    └── init.sql               ← Auto-run SQL on first MySQL startup
Docker Cheat Sheet: Quick Reference
Keep this cheat sheet bookmarked as a quick reference for the most commonly used Docker commands. All of these commands have been covered in detail throughout this tutorial.
# ── IMAGES ────────────────────────────────────
docker pull image:tag           # Download image
docker build -t name:tag .      # Build image from Dockerfile
docker images                   # List local images
docker rmi image:tag            # Delete image
docker image prune -a           # Remove all unused images

# ── CONTAINERS ────────────────────────────────
docker run -d -p 8080:80 nginx  # Run detached with port mapping
docker run -it ubuntu bash      # Run interactive shell
docker ps                       # List running containers
docker ps -a                    # List all containers
docker stop container           # Stop container
docker start container          # Start stopped container
docker rm container             # Remove stopped container
docker rm -f container          # Force remove running container
docker logs -f container        # Stream container logs
docker exec -it container bash  # Shell into running container
docker stats                    # Live resource usage

# ── VOLUMES ───────────────────────────────────
docker volume create name       # Create named volume
docker volume ls                # List volumes
docker volume rm name           # Remove volume
docker volume prune             # Remove unused volumes

# ── NETWORKS ──────────────────────────────────
docker network create name      # Create network
docker network ls               # List networks
docker network rm name          # Remove network

# ── COMPOSE ───────────────────────────────────
docker compose up -d            # Start all services
docker compose down             # Stop & remove containers
docker compose ps               # List service status
docker compose logs -f          # Follow all logs
docker compose up -d --build    # Rebuild & restart
Conclusion: What to Learn Next
You have now completed a thorough Docker tutorial for beginners. You know how to install Docker, understand images and containers, write Dockerfiles, manage data with volumes, connect containers with networks, and orchestrate full-stack applications with Docker Compose. These skills cover the vast majority of what you need for real-world development workflows and are the foundation for every advanced Docker and cloud topic.
The natural next steps from here are learning Kubernetes — the industry-standard system for orchestrating Docker containers at scale across multiple machines — and exploring Docker Swarm for simpler multi-host deployments. You should also explore CI/CD pipelines with Docker, which automate the process of building, testing, and pushing your Docker images whenever you push code to GitHub.
If you are building web applications, learning how to set up Nginx as a reverse proxy in front of your Docker containers is an important next step for production deployments. And if you are working in a team, Docker registries — either Docker Hub, GitHub Container Registry, or a private registry — are essential for sharing and deploying your images across environments.
Docker has become the lingua franca of modern software deployment. Whether you are a backend developer, a frontend engineer who needs a consistent local environment, a data scientist packaging ML models, or a DevOps engineer managing cloud infrastructure — Docker is an indispensable part of the toolkit. The skills you have built in this tutorial will serve you throughout your entire career.