Deploying a Laravel application on shared hosting can be tricky since most shared servers don't support the standard php artisan serve command. In this guide, you'll learn the complete, beginner-friendly process to upload your Laravel project to shared hosting using cPanel, configure the .env file, point the public folder correctly, set file permissions, and run database migrations — all without needing root or SSH access.
How to Deploy Laravel on Shared Hosting: Complete Step-by-Step Guide (2025)
Laravel is one of the most popular PHP frameworks, but deploying it on shared hosting requires a few extra steps compared to a VPS or dedicated server. Shared hosting providers like Hostinger, Bluehost, SiteGround, and Namecheap typically use cPanel and don't allow you to run terminal commands freely. Don't worry — this guide walks you through every single step to get your Laravel app live on shared hosting.
By the end of this tutorial, you will have a fully working Laravel application running on shared hosting, with a proper database connection, migrations executed, and your domain pointing to the correct public folder.
Table of Contents
- Prerequisites
- Prepare Your Laravel Project Locally
- Upload Laravel Files to Shared Hosting
- Fix the Folder Structure (public_html)
- Configure .htaccess Files
- Configure the .env File
- Create & Connect the Database
- Set File & Folder Permissions
- Set the Correct PHP Version
- Run Migrations via cPanel Terminal or PHP Script
- Create the Storage Symlink
- Common Errors & Troubleshooting
1. Prerequisites
Before you start, make sure you have the following ready:
- A working Laravel project on your local machine (tested with
php artisan serve) - A shared hosting account with cPanel access
- A domain or subdomain pointed to your hosting
- FTP client like FileZilla or access to cPanel's File Manager
- Your hosting's MySQL database credentials
- PHP 8.1 or higher available on the server (Laravel 10+ requires PHP 8.1)
2. Prepare Your Laravel Project Locally
Before uploading, make sure your project is production-ready. Run the following commands in your local terminal inside your Laravel project folder:
Step 2.1 — Install/Update Composer Dependencies (Production Mode)
Open your terminal in the Laravel project root and run:
composer install --optimize-autoloader --no-devThis removes development packages and optimizes the autoloader for better performance.
Step 2.2 — Clear & Cache Config (Optional but Recommended)
php artisan config:clear
php artisan cache:clear
php artisan view:clear
php artisan route:clear
Now zip your entire Laravel project folder. You can name it laravel-app.zip.
3. Upload Laravel Files to Shared Hosting
You have two ways to upload your project:
Option A — Using cPanel File Manager (Easiest)
- Log in to your cPanel account.
- Go to File Manager.
- Navigate to the root directory (one level above
public_html). - Click Upload and upload your
laravel-app.zip. - Once uploaded, right-click the zip file and click Extract.
Option B — Using FileZilla FTP
- Open FileZilla and connect using your FTP credentials from cPanel.
- Navigate to the root directory on the remote site (above
public_html). - Drag and drop your entire Laravel project folder from your local machine.
Important: Do NOT upload everything inside public_html directly. We'll handle that in the next step.
4. Fix the Folder Structure (public_html)
This is the most critical step. On shared hosting, your domain points to public_html. Laravel's web root is the public folder inside your project. You need to move/merge them properly.
After extracting, your server directory should look like this:
/home/your-username/
├── public_html/          ← domain points here
├── laravel-app/          ← your Laravel project (uploaded here)
│   ├── app/
│   ├── bootstrap/
│   ├── config/
│   ├── database/
│   ├── public/           ← this should become public_html
│   ├── resources/
│   ├── routes/
│   ├── storage/
│   ├── vendor/
│   └── .env
Step 4.1 — Move Laravel public folder contents to public_html
In cPanel File Manager:
- Open
laravel-app/public/ - Select all files inside it (index.php, .htaccess, etc.)
- Move them to
public_html/
Step 4.2 — Update index.php to Point to Correct Paths
File to edit: public_html/index.php
Open public_html/index.php in the File Manager editor and update the paths so they point to your Laravel project folder correctly:
<?php

use Illuminate\Contracts\Http\Kernel;
use Illuminate\Http\Request;

define('LARAVEL_START', microtime(true));

// ─── Update these two lines ───────────────────────────────────────────────────

// Path to your Laravel project's vendor/autoload.php
require __DIR__.'/../laravel-app/vendor/autoload.php';

// Path to your Laravel project's bootstrap/app.php
$app = require_once __DIR__.'/../laravel-app/bootstrap/app.php';

// ─────────────────────────────────────────────────────────────────────────────

$kernel = $app->make(Kernel::class);

$response = $kernel->handle(
    $request = Request::capture()
)->send();

$kernel->terminate($request, $response);
Explanation: The __DIR__ refers to public_html, so /../laravel-app/ goes one level up and into your Laravel project folder. Adjust laravel-app to match your actual folder name.
5. Configure .htaccess Files
You need two .htaccess files — one in public_html and one in your laravel-app root.
File 1: public_html/.htaccess
Create or update the file at: public_html/.htaccess
<IfModule mod_rewrite.c>
    <IfModule mod_negotiation.c>
        Options -MultiViews -Indexes
    </IfModule>

    RewriteEngine On

    # Handle Authorization Header
    RewriteCond %{HTTP:Authorization} .
    RewriteRule .* - [E=HTTP_AUTHORIZATION:%{HTTP:Authorization}]

    # Redirect Trailing Slashes If Not A Folder...
    RewriteCond %{REQUEST_FILENAME} !-d
    RewriteCond %{REQUEST_URI} (.+)/$
    RewriteRule ^ %1 [L,R=301]

    # Send Requests To Front Controller...
    RewriteCond %{REQUEST_FILENAME} !-d
    RewriteCond %{REQUEST_FILENAME} !-f
    RewriteRule ^ index.php [L]
</IfModule>
File 2: laravel-app/.htaccess (Protect Laravel Root)
Create or update the file at: laravel-app/.htaccess
# Deny access to the Laravel root from web
Deny from all
This prevents anyone from accessing your app/, config/, .env, and other sensitive files directly through a URL.
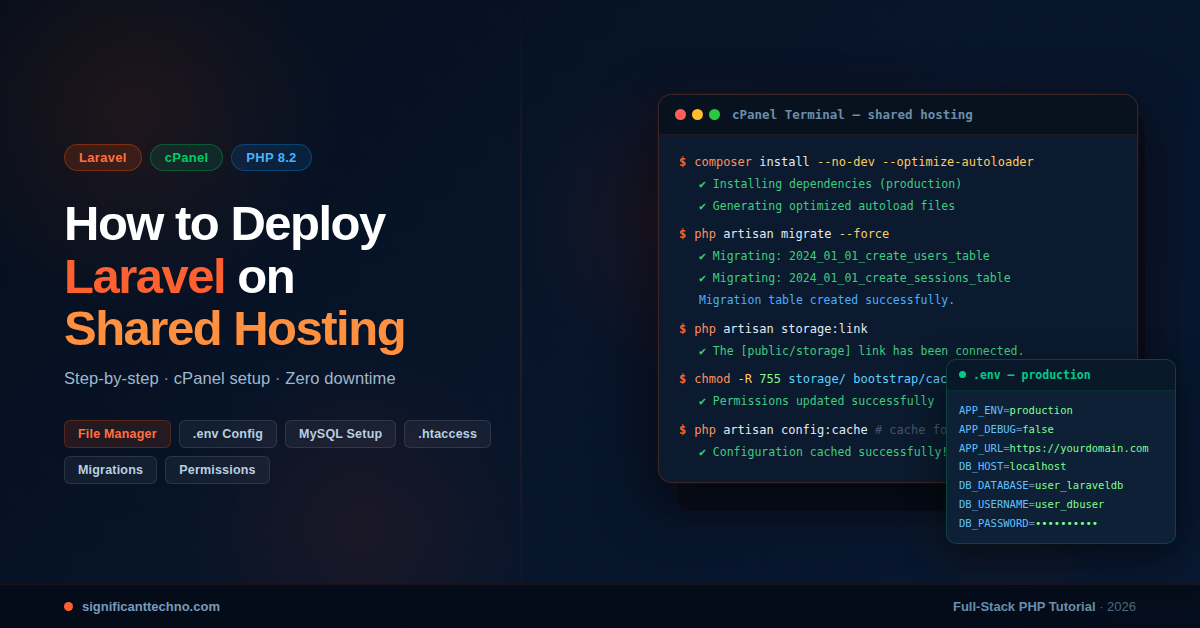
6. Configure the .env File
The .env file stores all your environment configuration — database credentials, app URL, mail settings, and more.
File location: laravel-app/.env
Open it in File Manager and update these values:
APP_NAME="My Laravel App"
APP_ENV=production
APP_KEY=base64:YOUR_GENERATED_APP_KEY_HERE
APP_DEBUG=false
APP_URL=https://yourdomain.com

LOG_CHANNEL=stack
LOG_LEVEL=error

DB_CONNECTION=mysql
DB_HOST=localhost
DB_PORT=3306
DB_DATABASE=your_cpanel_username_dbname
DB_USERNAME=your_cpanel_username_dbuser
DB_PASSWORD=your_database_password

CACHE_DRIVER=file
SESSION_DRIVER=file
QUEUE_CONNECTION=sync
Note: Set APP_DEBUG=false in production. Never expose debug information publicly. If you don't have an APP_KEY, generate one locally with php artisan key:generate and copy the value.
7. Create & Connect the Database
Step 7.1 — Create a Database in cPanel
- In cPanel, go to MySQL Databases.
- Create a new database (e.g.,
myuser_laraveldb). - Create a new database user with a strong password.
- Add the user to the database with All Privileges.
- Note the database name, username, and password.
On most shared hosts, the database host is localhost. Update your .env accordingly as shown in the previous step.
8. Set File & Folder Permissions
Laravel needs write access to the storage and bootstrap/cache directories. In cPanel File Manager:
- Navigate to
laravel-app/storage/ - Right-click → Change Permissions → set to 755
- Do the same for
laravel-app/storage/logs/ - Do the same for
laravel-app/bootstrap/cache/
If you have SSH access, you can run:
chmod -R 755 /home/your-username/laravel-app/storage
chmod -R 755 /home/your-username/laravel-app/bootstrap/cache
9. Set the Correct PHP Version
Laravel 10 requires PHP 8.1+, and Laravel 11 requires PHP 8.2+. Shared hosts let you choose the PHP version per domain.
- In cPanel, look for MultiPHP Manager or Select PHP Version.
- Select your domain and choose PHP 8.1 or higher.
- Make sure these PHP extensions are enabled:
opensslpdo_mysqlmbstringtokenizerxmlctypejsonbcmathfileinfo
10. Run Migrations via cPanel Terminal or PHP Script
This is where most beginners get stuck. You can't run php artisan migrate from a browser. Here are two options:
Option A — Use cPanel Terminal (If Available)
Some hosting providers offer a terminal in cPanel (look for Terminal under Advanced). If available:
cd /home/your-username/laravel-app
php artisan migrate --force
Option B — Create a Temporary PHP Script
If no terminal is available, create a temporary PHP file to run artisan commands via the browser.
Create file: public_html/run-migrate.php
<?php
// ⚠️ IMPORTANT: Delete this file immediately after use!
// This file is a security risk if left on your server.

define('LARAVEL_START', microtime(true));

require __DIR__.'/../laravel-app/vendor/autoload.php';

$app = require_once __DIR__.'/../laravel-app/bootstrap/app.php';

$kernel = $app->make(Illuminate\Contracts\Console\Kernel::class);

// Run migrate
$status = $kernel->call('migrate', ['--force' => true]);

echo '<pre>';
echo $kernel->output();
echo '</pre>';
echo 'Migration status: ' . $status;
Now visit https://yourdomain.com/run-migrate.php in your browser. You should see migration output. Delete this file immediately after running migrations.
You can reuse this pattern to run other artisan commands by replacing 'migrate' with commands like 'db:seed', 'optimize', etc.
11. Create the Storage Symlink
If your application uses file uploads or storage links (e.g., storage/app/public), you need to create the symlink. Again, use either terminal or a temporary PHP script.
Via Terminal:
cd /home/your-username/laravel-app
php artisan storage:link
Via PHP Script:
Create file: public_html/run-storage-link.php
<?php
// ⚠️ Delete after use!

define('LARAVEL_START', microtime(true));

require __DIR__.'/../laravel-app/vendor/autoload.php';

$app = require_once __DIR__.'/../laravel-app/bootstrap/app.php';

$kernel = $app->make(Illuminate\Contracts\Console\Kernel::class);

$status = $kernel->call('storage:link');

echo '<pre>';
echo $kernel->output();
echo '</pre>';
Visit https://yourdomain.com/run-storage-link.php and then delete it.
12. Common Errors & Troubleshooting
❌ Error: 500 Internal Server Error
This usually means a PHP error. Temporarily set APP_DEBUG=true in .env to see the actual error message. Remember to set it back to false after fixing the issue.
❌ Error: No application encryption key has been specified
Your APP_KEY in .env is missing or empty. Generate one locally:
php artisan key:generate --showCopy the output and paste it as the value of APP_KEY in your .env file.
❌ Error: SQLSTATE[HY000] [2002] Connection refused
Your database credentials in .env are wrong, or the database host is not localhost. Double-check the database name, username, and password in cPanel's MySQL Databases section.
❌ Error: The stream or file storage/logs/laravel.log could not be opened
The storage folder doesn't have write permissions. Set it to 755 as described in Step 8.
❌ Blank White Page
Check that public_html/index.php has the correct paths to vendor/autoload.php and bootstrap/app.php.
❌ CSS / JS Not Loading (404)
Make sure your APP_URL in .env is set to your actual domain with https://. Also check that asset paths in your Blade templates use {{ asset('...') }}.
Final Checklist Before Going Live
- ✅
public_html/index.phppaths updated - ✅
public_html/.htaccessconfigured - ✅
.envhas correct DB credentials andAPP_URL - ✅
APP_DEBUG=falsein production - ✅
storage/andbootstrap/cache/permissions set to 755 - ✅ PHP version set to 8.1+ in cPanel
- ✅ Migrations ran successfully
- ✅ Storage symlink created (if needed)
- ✅ Temporary PHP scripts deleted
- ✅ Laravel root protected with
.htaccess(Deny from all)
Conclusion
Deploying Laravel on shared hosting is entirely possible with the right approach. The key is to keep your Laravel project outside public_html and only expose the public folder contents through the web root. By following this guide step by step, you can host your Laravel application on any cPanel-based shared hosting provider without needing a VPS or dedicated server.
If you run into any issues not covered here, check the storage/logs/laravel.log file — it usually contains the exact error message you need to diagnose the problem.
Have questions or got stuck at a specific step? Drop a comment below — we're happy to help!